When internal memory in Arduino is not sufficient then we must go for external EEPROM module. This module is based on the EEPROM chip AT24C256, which has 256k bit capacity. It communicates with Arduino using I2C bus.
- Arduino analog pin 4 to EEPROM pin 5
- Arduino analog pin 5 to EEPROM pin 6
- Arduino 5V to EEPROM pin 8
- Arduino GND to EEPROM pin 1,2,3,4
CIRCUIT DIAGRAM
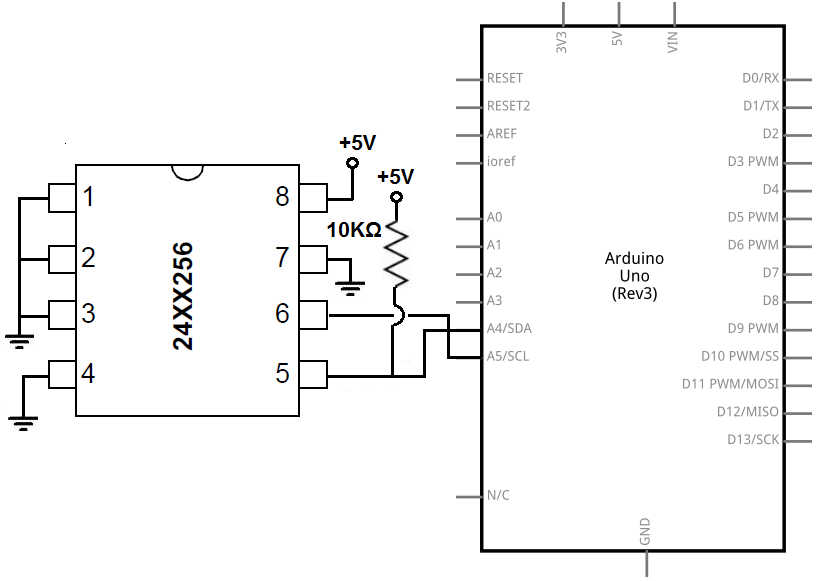
Interfacing External Memory with Arduino UNO
Be sure to leave pin 7 of the EEPROM open or tie it to GND otherwise the EEPROM will be write protected. Open a sketch in Arduino IDE and copy below program, it has two function one for reading a byte and another to write a byte in to EEPROM module.
#include Wire.h
#define EEPROM_ADDR 0x50    // I2C Buss address of 24LC256 256K EEPROM

Byte i2c_eeprom_read_byte( int deviceaddress, unsigned int eeaddress )
{
   byte rdata = 0xFF;
   Wire.beginTransmission(deviceaddress);
   Wire.write((int)(eeaddress >> 8));    // Address High Byte
   Wire.write((int)(eeaddress & 0xFF));  // Address Low Byte
   Wire.endTransmission();
   Wire.requestFrom(deviceaddress,1);
   if (Wire.available()) rdata = Wire.read();
   return rdata;
 }
void i2c_eeprom_write_byte( int deviceaddress, unsigned int eeaddress, byte data )
 {
   int rdata = data;
   Wire.beginTransmission(deviceaddress);
   Wire.write((int)(eeaddress >> 8));    // Address High Byte
   Wire.write((int)(eeaddress & 0xFF));  // Address Low Byte
   Wire.write(rdata);
   Wire.endTransmission();
 }
void setup()
{
   Wire.begin();  // join I2C bus (address optional for master)
   Serial.begin(9600);  // TESTS FOR EACH FUNCTION BEGIN HERE
   Serial.println("Writing Test:");
   for (int i=0; i<20; i++){    // loop for first 20 slots
                                // write address + 65 A or 97 a
   i2c_eeprom_write_byte(EEPROM_ADDR,i,i+65);
   Serial.print(". ");
   delay(10);           // NEED THIS DELAY!
 }
   Serial.println("");
   delay(500);
   Serial.println("Reading Test:");
   for (int i=0; i<20; i++){    // loop for first 20 slots
     Serial.write(i2c_eeprom_read_byte(EEPROM_ADDR, i));
     Serial.print(" ");
   }
 }
 Loop()
 {
 Serial.println(“”);
 Delay(10);
 }